How to Create and Manage Your Google Scholar Profile: A Step-by-Step Guide
2264 views||Release time: Oct 21, 2025
In the digital age of research, having a professional online presence is crucial. A Google Scholar profile serves as your academic business card, showcasing your publications, tracking your citations, and helping potential collaborators and employers find your work. It's a free and powerful tool for managing your scholarly identity.
Whether you're a new graduate student or an established professor, creating and actively managing your profile is a vital step. This guide provides a clear, step-by-step walkthrough of the entire process.
Phase 1: Creating Your Profile Step 1: Go to Google Scholar Navigate to the Google Scholar homepage (https://scholar.google.com/). Make sure you are logged into the Google account you want associated with your academic profile (using your institutional email address is often recommended but not strictly required for login, though it's needed for verification later).
Step 2: Access "My Profile" Click on "My Profile" in the top left corner of the Google Scholar homepage.
Step 3: Complete the Initial Setup Form You will be prompted to fill in some basic information:
Name: Enter your full name as you typically publish it.
Affiliation: Enter your current university, department, or research institution. Be precise (e.g., "Department of Computer Science, National University of Singapore").
Email for verification: This is critical. Enter your official institutional email address (e.g., your .edu, .ac.uk, .edu.sg address). Google Scholar will send a verification email here. Verifying with an institutional email adds credibility and allows your profile to appear in public search results.
Areas of interest: Add keywords related to your research field (e.g., "machine learning," "cancer biology," "postcolonial literature"). Separate them with commas. This helps others find you.
Homepage (Optional): If you have a personal academic website or lab page, enter the URL here.
Click "Next."
Step 4: Add Your Publications (Initial Claiming) Google Scholar will now search for articles it thinks belong to you. This is the most important step and requires careful attention.
Article Groups: It may present groups of articles associated with similar names. Review each group. If a group belongs entirely to you, click "Add all articles."
Individual Articles: It may also suggest individual articles. Review each one. Click "Add article" for those that are yours.
Search Manually: If Google Scholar misses articles, you can use the search bar at the top to find specific papers and add them individually.
Be Thorough but Cautious: It's better to add fewer articles initially and add more later than to accidentally claim someone else's work.
Click "Next."
Step 5: Set Profile Visibility and Updates
Profile visibility: Strongly recommended: Make my profile public. A public profile allows anyone to find your work. A private profile is essentially just for your own use.
Follow email: Set up an email address to receive notifications about new citations or related research (optional).
Article updates: Choose how you want Google Scholar to handle new articles it finds or changes to existing ones.
Automatic updates (Recommended with caution): Google Scholar will automatically add new papers it thinks are yours. This saves time but can lead to errors.
Email me updates for review (Safest option): You receive an email and must manually approve any additions or changes. This gives you full control over accuracy.
Click "Done."
Step 6: Verify Your Email Address Check your institutional email inbox for a verification message from Google Scholar and click the link inside. Your profile is now live (if set to public)!
Phase 2: Managing Your Profile (Ongoing Maintenance) Your profile is not static. You need to manage it to keep it accurate and complete.
Step 1: Add a Professional Photo Click the placeholder photo icon on your profile page to upload a clear, professional headshot. Profiles with photos are more engaging.
Step 2: Regularly Add/Correct Publications This is the most crucial maintenance task. From your profile page:
Click the + icon: This gives you several options:
Add article groups: If Google finds new potential groups of your papers.
Add articles: Search for specific articles you published that are missing.
Add article manually: Use this for publications Google Scholar might not index automatically, such as book chapters, some conference papers, patents, or very recent articles. You will need to enter the bibliographic details yourself.
Merge Duplicates: Sometimes, one paper appears as two entries (e.g., a preprint and the final version). Check the boxes next to the duplicate entries and click the "Merge" button that appears at the top. This combines them and consolidates their citation counts.
Delete Incorrect Articles: If a paper that isn't yours appears on your profile, check the box next to it and click the "Delete" button.
Step 3: Update Your Information If you change institutions, get promoted, or shift your research focus, update your affiliation and areas of interest by clicking the "Edit" (pencil) icon next to those fields on your profile.
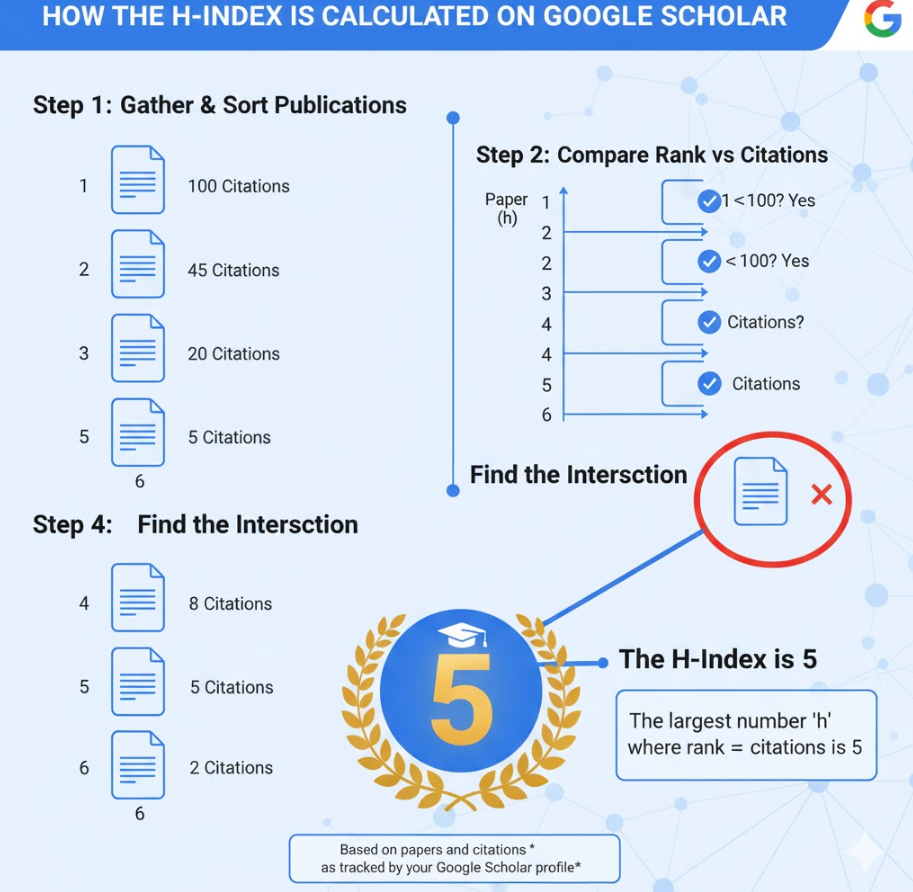
Step 4: Monitor Your Citations and Metrics Google Scholar automatically tracks citations to the papers in your profile and calculates metrics like the h-index and i10-index. Regularly reviewing this can give you insights into the impact of your work.
Conclusion
Creating your Google Scholar profile takes only a few minutes, but managing it is an ongoing process. By regularly adding new publications, correcting errors, and keeping your information current, you create a powerful, accurate, and professional showcase of your scholarly achievements that benefits both you and the wider research community.
Hot Conferences
ICITT 2026
Submission Deadline: Jul 25, 2026
2026 10th International Conference on Intelligent Traffic and Transportation
Sep 02-Sep 04, 2026
Norway
WAIE 2026
Submission Deadline: Aug 05, 2026
2026 8th International Workshop on Artificial Intelligence and Education